After you have installed and activated your Beauty Retouch UXP Panel, install and activate its custom Tool Presets, Brushes, and Actions via the steps below.
Upgrading to Beauty Retouch v5? When replacing your Beauty Retouch UXP with the latest Beauty Retouch v5, please follow the Step 5 instructions on this page instead.
Step 1: Locate the Tools Folder
Inside the downloaded and unzipped installation package, locate the BR_UXP_Tools folder.
Your installation package folder may contain different files and subfolders depending on the type of panel you have purchased.
Important: The BR Tools Installer script automatically places the custom Brushes (.abr), Tool Presets (.tpl), and Actions (.atn) files into their respective Photoshop Presets folders. However, privacy settings on your computer may prevent the .JSX script file from running correctly. If that happens, follow the manual installation steps in Step 2.
Step 2: Run the Tools Script
In Photoshop, go to File → Scripts → Browse... and locate the BR_Tools_Installer.jsx script file on your computer. Press Open.
When the Presets Installed notification appears, press OK.
Troubleshooting: If you did not receive the "Presets Installed" notification, the automatic installation did not complete. This typically happens when Adobe folders on your computer have restricted permissions, preventing the script from placing files in the correct location.
Follow these steps to install the files manually before proceeding to the next step.
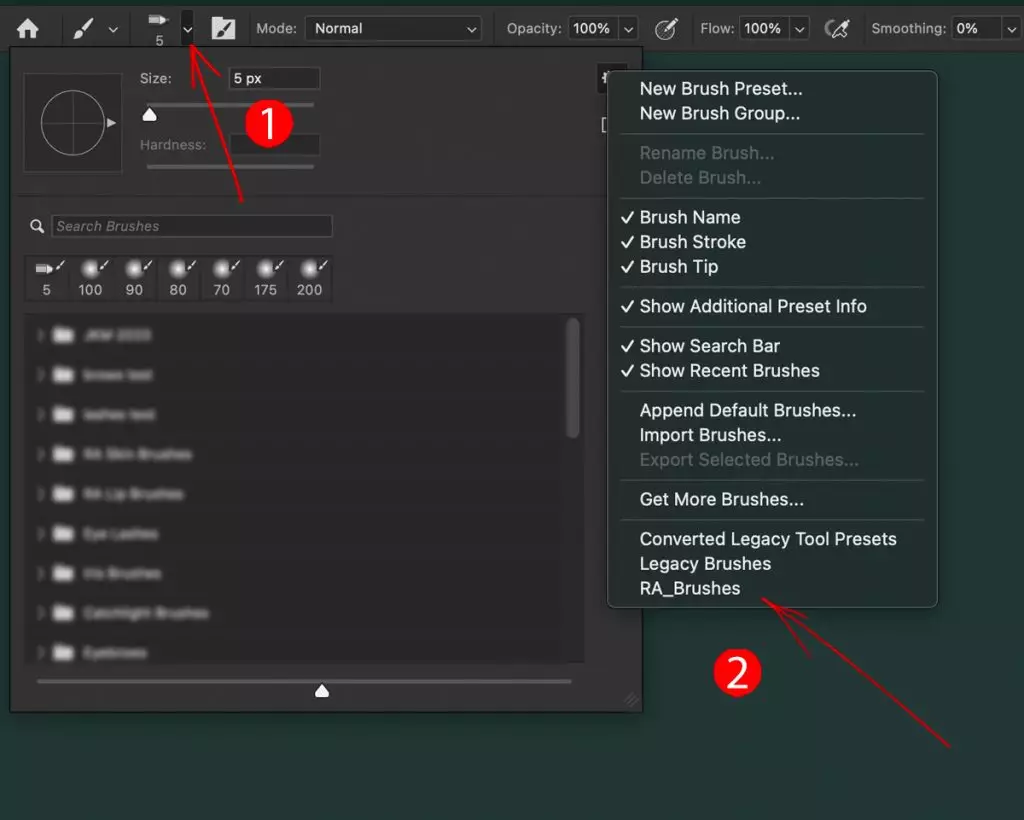
Step 3: Activate Tool Presets
In Photoshop, open the Tool Presets panel via Window → Tool Presets, or click the Tool Preset Picker icon in your Options Bar.
Click the Panel Options icon in the upper right corner of the panel and select RA_Presets from the list. When prompted, select Append to add these Tool Presets to your existing ones.
Important: If asked how to load the presets, select Load as Tools. If you load them as Brushes, the Brush buttons on the panel will not work.
The following Tool Presets will appear in the Tool Preset Picker for the Brush tool:
- Hair Shine 1
- Hair Shine 2
- RA D&B Global 300px
- RA D&B Global 10px
Step 4: Activate Custom Brushes
In Photoshop, open the Brushes panel via Window → Brushes. Click the Panel Options icon in the upper right corner and select RA_Brushes from the list of Brush Presets. When prompted, select Append to add these to your existing brushes.
The following Brush Presets will appear in the Brush Preset Picker:
- Hair Shine 1
- Hair Shine 2
- RA Hair Brush — Sharp
- RA Hair Brush — Softer
- RA D&B Global 300px
- RA D&B Global 10px
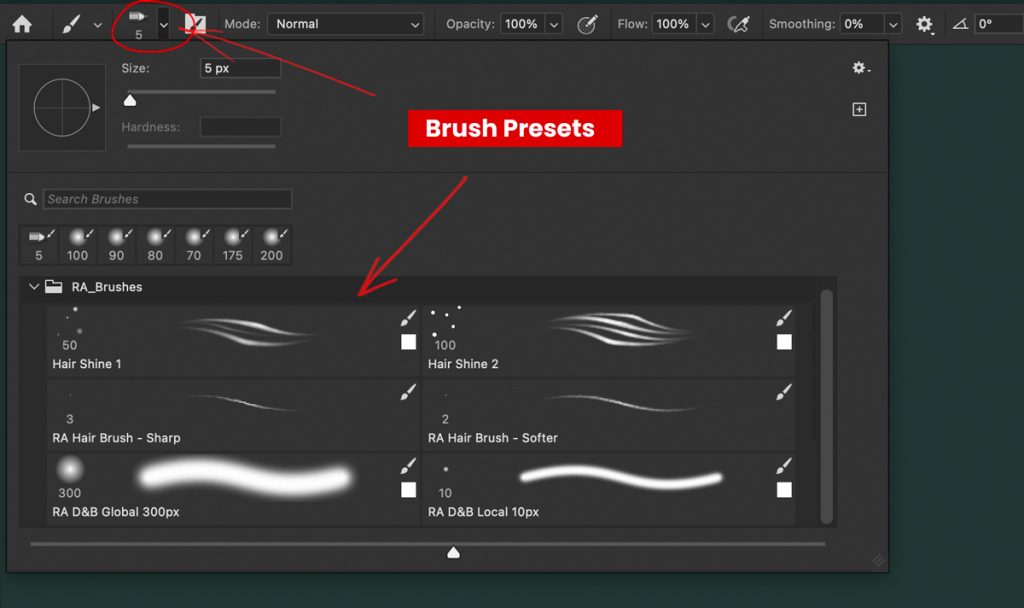
The Hair Shine and RA D&B Brushes can be activated directly from the panel. The RA Hair Brushes are a standalone addition to the set — they are not linked to the panel and are activated directly from the Brushes panel.
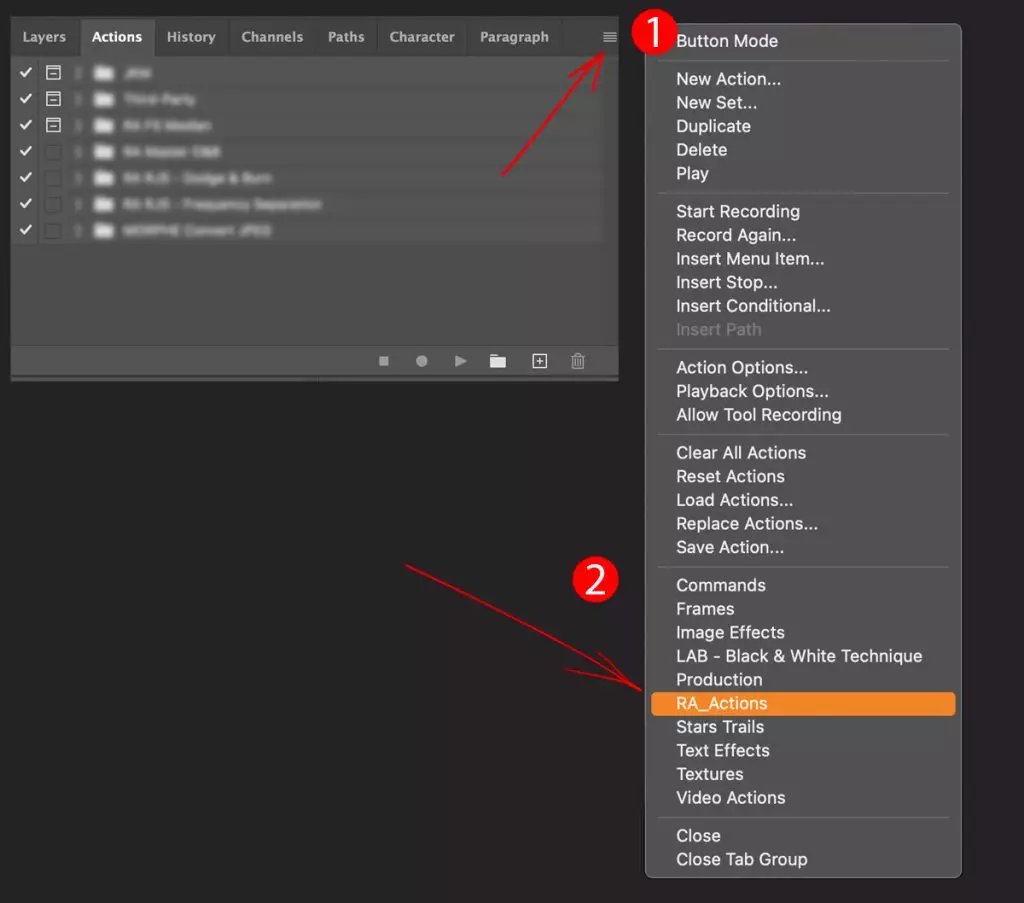
Step 5: Activate Custom Actions
In Photoshop, open the Actions panel via Window → Actions. Click the Panel Options icon in the upper right corner and select RA_Actions from the list. When prompted, select Append to add these to your existing Actions.
On some computers, Photoshop adds the RA Actions to the Actions panel automatically. If RA Actions is already listed in your Actions panel, skip this step and move on to Step 6.
This adds the RA User Actions group — with A–F placeholders for your own custom Actions — and activates the row of buttons in the My Actions section of the Beauty Retouch Panel.
Step 6: Add Your Own Custom Actions
Once the RA User Actions are activated, you can add your own custom Actions to the Beauty Retouch UXP Panel by following the steps in this video:
Dedicated Support Team
If the FAQ does not resolve your issue, please contact our friendly Support Team: Submit a Support Ticket.